Steps to Take:
1. Open the Photobucket site at http://www.photobucket.com
Enter your username and password at the top of the page, then click the log in button to log into your Photobucket account.
2. Select albums & upload from the menu at the top of your album.
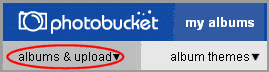
3. Select albums & upload from the menu at the top of your album.
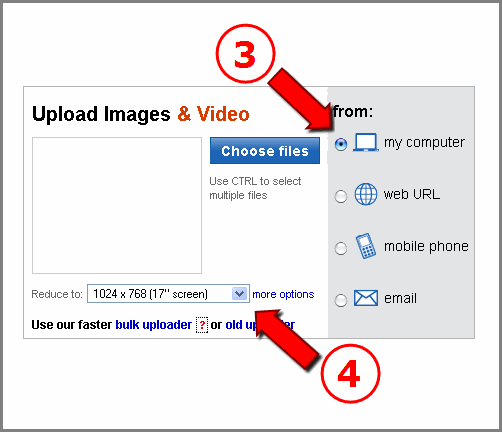
Navigate to the album you would like to upload your images and videos into. Check the "my computer" box from the right side of the uploader.
4.You can select a default upload size from the "more options" link. This will allow all subsequent uploads to adhere to the selected size. However, choosing an option from the drop-down menu will allow for one-off sizing control.
Note: For additional controls such as the ability to scramble filenames, click on the "more options" link.
5. Click on the "Choose files" button when you are ready to select your content. You can upload both images and videos at the same time using this method!
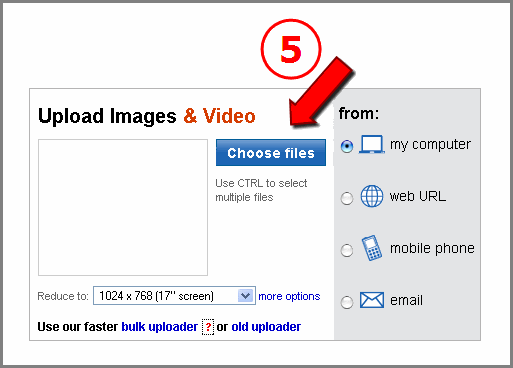
6. You can choose both images and videos together here. Also, holding down shift or ctrl on the PC will allow you to select multiple files at once. On a Mac, simply hold down shift or the Apple/Command key to select multiple files.
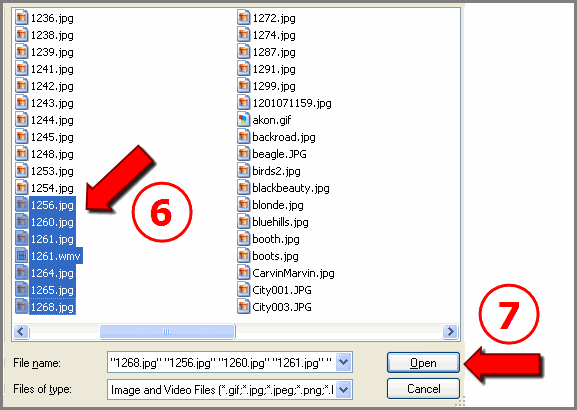
Note: Currently, you can only upload 50 files at a time using this method. This includes both images and videos.
7. Double click on the images or videos you would like to upload, or select the "Open" button with the files highlighted.
Note: Supported image file types are jpg, jpeg, gif, png, bmp (bmp will convert to jpg on upload) and swf files (can only be uploaded with a Pro account).
Note: Supported video file types are 3g2, 3gp, 3gp2, 3gpp, 3p, asf, avi, divx, dv, dvx, flv, moov, mov, mp4, mpeg4, mpg4, mpe, mpeg, mpg, qt, wmv, xvid
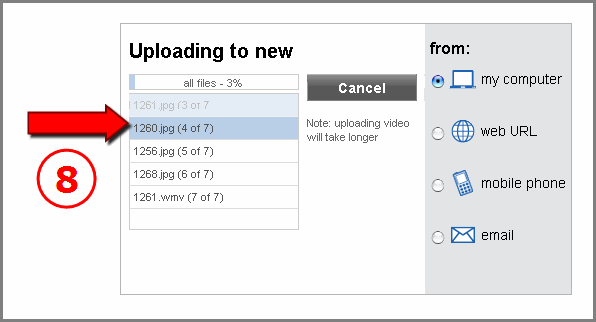
8. Your files will begin to upload as soon as you double click them or select the "Open" button with the content highlighted. You will see a progress meter above your files that denotes the overall status of your upload. Images will always upload first, and videos will always upload last. Please be patient when videos are being uploaded as they tend to take longer depending on size, length, and internet connection speed.
Note: Simply click on the "Cancel" button to cancel your upload.
9.When the files have successfully been uploaded, a message will appear at the top of your page that says, "X of X images and videos have uploaded!" This message may be different depending on the types of files you have selected.
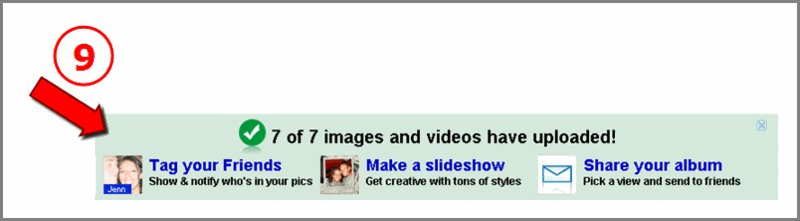
Your images and videos are now available in your Photobucket account for sharing and linking around the web!
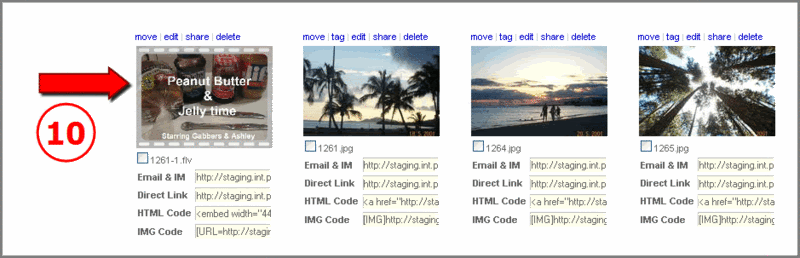
11. Click on the IMG Code to copy the image code and paste it where ever you like
1. Open the Photobucket site at http://www.photobucket.com
Enter your username and password at the top of the page, then click the log in button to log into your Photobucket account.
2. Select albums & upload from the menu at the top of your album.
3. Select albums & upload from the menu at the top of your album.
Navigate to the album you would like to upload your images and videos into. Check the "my computer" box from the right side of the uploader.
4.You can select a default upload size from the "more options" link. This will allow all subsequent uploads to adhere to the selected size. However, choosing an option from the drop-down menu will allow for one-off sizing control.
Note: For additional controls such as the ability to scramble filenames, click on the "more options" link.
5. Click on the "Choose files" button when you are ready to select your content. You can upload both images and videos at the same time using this method!
6. You can choose both images and videos together here. Also, holding down shift or ctrl on the PC will allow you to select multiple files at once. On a Mac, simply hold down shift or the Apple/Command key to select multiple files.
Note: Currently, you can only upload 50 files at a time using this method. This includes both images and videos.
7. Double click on the images or videos you would like to upload, or select the "Open" button with the files highlighted.
Note: Supported image file types are jpg, jpeg, gif, png, bmp (bmp will convert to jpg on upload) and swf files (can only be uploaded with a Pro account).
Note: Supported video file types are 3g2, 3gp, 3gp2, 3gpp, 3p, asf, avi, divx, dv, dvx, flv, moov, mov, mp4, mpeg4, mpg4, mpe, mpeg, mpg, qt, wmv, xvid
8. Your files will begin to upload as soon as you double click them or select the "Open" button with the content highlighted. You will see a progress meter above your files that denotes the overall status of your upload. Images will always upload first, and videos will always upload last. Please be patient when videos are being uploaded as they tend to take longer depending on size, length, and internet connection speed.
Note: Simply click on the "Cancel" button to cancel your upload.
9.When the files have successfully been uploaded, a message will appear at the top of your page that says, "X of X images and videos have uploaded!" This message may be different depending on the types of files you have selected.
Your images and videos are now available in your Photobucket account for sharing and linking around the web!
11. Click on the IMG Code to copy the image code and paste it where ever you like
