C
car_fanatica
Guest
Hey guys,
Firstly a bit of background..
I have always intended to ensure this vehicle was to remain stock & comfortable in my ownership, and I still adopt that policy. However - In the past few months of my ownership, I have noticed that the overall handling of the vehicle can be a little bit 'soft & unpredictable' for my likings.
All in all, the vehicle handles reasonably well for a stock setup, but I have come to notice the main issue with the handling of the vehicle, is their rear trailing beam setup, and the subsequent floaty/understeer feel of the rear end.. Even on general cornering. So after I'd done a bit of reading - I realised the N16 has a quite a heavy rear end, which is quite likely a good reason why on cornering/bumps - it displays this understeer/float, and at times - a very unstable twitch also.
So I decided I would like to attempt to rectify this issue, in order to create better overall driveability, and make the car overall better for its use in my business.
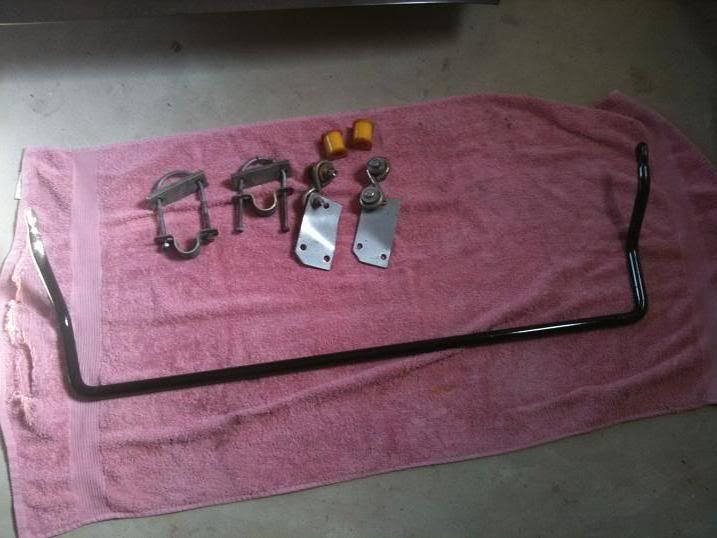
In order to do that, I decided that If I could find an N15 Whiteline Rear Swaybar, I would retrofit it to the N16. This would achieve my overall goal of firming up the rear end mildly and eliminating these issues, whilst maintaining the stock & comfortable status I need it to be. When a noticed a local member/friend selling one for a bargain $50, I went for it!
-------------------------------------------------------------------------------------
Secondly, a bit of background on the technical front..
Fortunately for us, the N16 & N15 share the same rear trailing beam suspension setup, which allows us to do this modification, but unfortunately for us - On the N16, it is not a straightforward bolt-in fitment operation like it is on the N15.
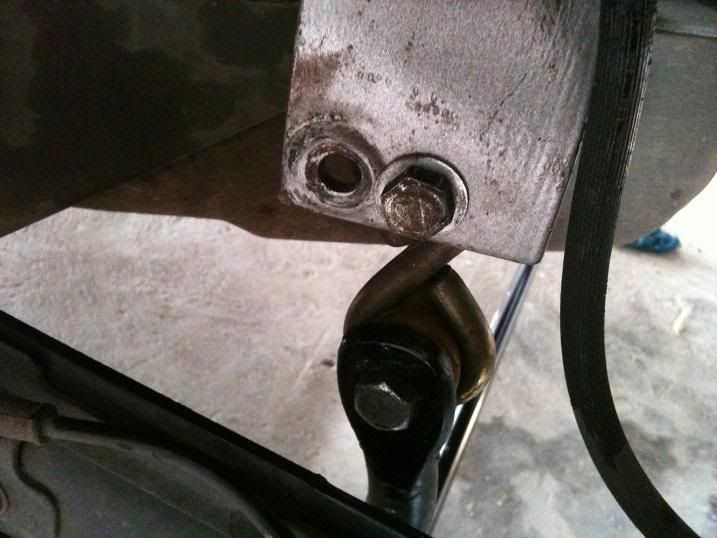
On the N15 - The Whiteline Rear Swaybar is designed to bolt directly into the 2x bolts for the brakeline bracket on the chassis, using a bracket, 8 links, and a series of nuts/bolts/washers.. Then it bolts to the trailing beam using a u-shackle, flat bar, bush, clamp, and nut/washer.
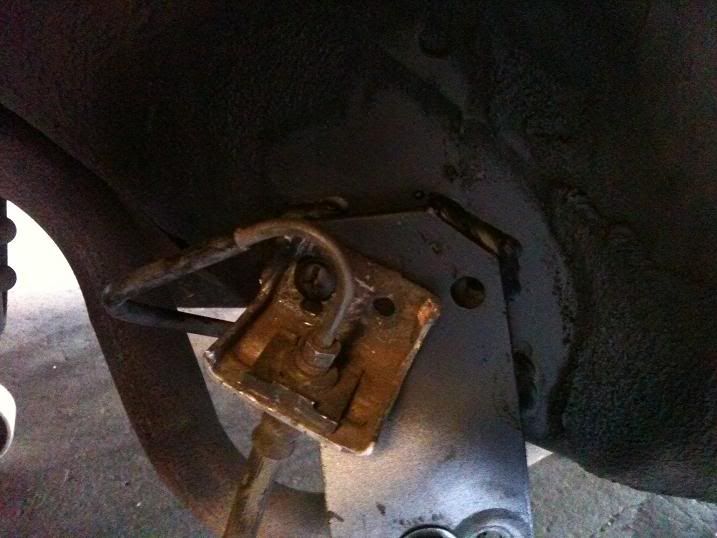
The same system applies with the N16, however on the N16 - The brakeline bracket is physically tack-welded to the chassis, instead of bolted in. This means you need to do a little bit of extra work, in order for it to fit.
Also - Because the Whiteline unit available for the N16 is getting quite scarce, and subsequently can be well overpriced - and because the Whiteline unit available for the N15 is plentiful, and subsequently can be picked up cheap seconhand - and because the N15 unit has a much better design in terms of torsion & rigidity - and lastly, because they share the same rear trailing beam suspension setup as mentioned earlier, this makes this modification a good comprimise, with an inevitably successful result.
-------------------------------------------------------------------------------------
Materials Required:-
- 1x N15 Whiteline Rear Swaybar Kit (Part# BNR21 or BNR21Z)
- 6x 14G x 25mm Self Tapping Sheet Metal Screws
- 1x 500 mL Bottle Of Brake Fluid
- 1x Hydraulic Trolley Jack
- 1x Pair Of Jackstands
- 1x Pair Of Wheel Chocks
- 1x 1/2" Drive Breaker Bar
- 1x 1/2" Drive 21mm Socket
- 1x Electric Drill
- 1x Various Metal Drill Bits
- 1x Phillips Head Driver Drill Bit
- 1x 8mm, 12mm, 14mm, & 15mm Spanners
- 1x Hammer
- 1x Old Bucket
- 1x Wire Wheel Bit
- 1x Pressure Pack Of Metal Etch Primer
- 1x Pressure Pack Of Black Enamel Paint
- 1x MIG/TIG Welder
- 1x Old Coke Bottle
- 1x 200mm Piece Of Small Clear Tube/Line
- 1x Spare Pair Of Legs
- 1x General Awesomeness
-------------------------------------------------------------------------------------------------------------------------------
Modification Process:-
Step 1: General Safety & Preparations..
Before you start the modification, you will obviously need to do a few preparations & safety procedures.
So make sure you have the car parked in a safe spot, place your wheels chocks in front of the front wheels, and then you will need to jack the car up in order to get under it to do the job.
To do this, you will need to first use your breaker bar + 21mm socket, to crack the 4x wheel nuts. Once you have done this, you can proceed to jack the car up by placing your trolley jack underneath the rear of the car in a safe location, such as the rear trailing beam itself. Jack the car up as high as you can, in order to ensure maximum working space, for ease of job. Then you can place your jack stands on either side of the bottom sill panel on the car, slowly lower your hydraulic jack, and pull it out of the way.
Now that the car is secure, proceed to remove the rear wheels using the breaker bar + 21mm socket again, by fully removing each of the wheel nuts, and subsequently removing the entire wheels.
Now the car is safe, prepared, and ready for the modification.
Step 2: Removing The Brake Lines..
Now that you've got the car safely secured, you can begin modding!
The first thing to do is to remove the brake lines.
To do this you will need to use your old bucket and place that underneath the 'drip zone' of your brake line, as this will stop fluid spill all over your floor. Then you will need to use your 8mm spanner to 'crack' the nut on the brake line, and at this point you will notice the brake fluid begin to flow out of the line. This is normal.
Continue to remove the line until it is fully unwound, and push the rubber brake line out of the way.
It is usually a good idea to let it fully drain before doing anything further, so as not to 'flick' brake fluid everywhere. You can usually make the best of your time by doing one side while the other drains, and then the go back to the original side which will have drained by the time you are done with the second side.
Repeat this step for both sides of the vehicle.
Note: Remember brake fluid is very corrosive, so it is always a good idea to keep wiping your hands on a rag. Always use the same rag for this purpose, but not for anything else.

Step 3: Removing The Brake Line Brackets..
Now that the active brake lines are out of the way, you will need to remove the old brake line bracket.
Unlike the N15, the N16 has the bracket tack welded to the body which means you cannot simply bolt it on to the body. I covered this earlier in the article.
To combat this, we need to either install a fastening system of our own, or weld it to the body. I weighed up my options and decided that most fasteners were going to either be too tricky to install, or foul on the fuel tank and/or the exhaust system, so I opted to weld it.
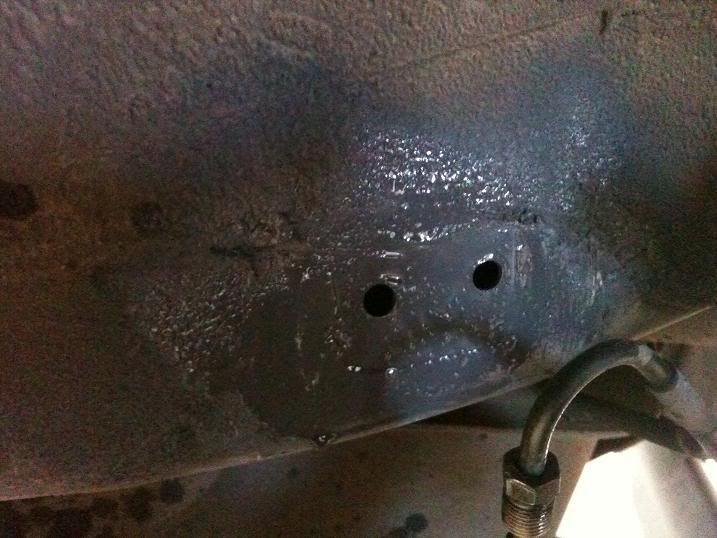
So in order to remove the bracket, you will need to get your drill and a small drill bit, and drill out the 2x factory tack welds right through. Once you've done this with a small bit, you will have created a pilot for to use a larger bit. The reason for this progressive drilling is because sheet metal is quite unpredictable at times, and a jag while drilling can be a dangerous. So then I used a drill bit large enough to cover the entire span of the tack weld, and redrilled it through again. Once you've done this, the weld will be 99% weakened.
Then all you need to do is simply 'knock' the bracket off using your hammer, and this part is done.

Step 4: Preparing The Swaybar Bracket Area..
Now that the brake line bracket is off, you can start to mock-up your swaybar bracket, but before you do this - you need to prepare the area.
To do this you will need to use your drill again and your wire wheel bit to suit your drill, and simply grind any old sealant and body schutz away from the area of where the swaybar bracket will intend to go. This will leave a clean surface for mounting, and a clean area of steel for welding. Once you've done this, you will be left with an area of steel that has been stripped back to bare. This is normal.
Once you've established that, you quickly need to just etch prime the area using your pressure pack of etch primer, and spray a healthy coat over all of the bare metal. This will prevent corrosion forming over the area, and prepare it for any topcoating you may do later.
Alternatively, if you intend to re-apply body shutz to the area afterwards - you can skip this part.
... Continue'd Next Post ...
Firstly a bit of background..
I have always intended to ensure this vehicle was to remain stock & comfortable in my ownership, and I still adopt that policy. However - In the past few months of my ownership, I have noticed that the overall handling of the vehicle can be a little bit 'soft & unpredictable' for my likings.
All in all, the vehicle handles reasonably well for a stock setup, but I have come to notice the main issue with the handling of the vehicle, is their rear trailing beam setup, and the subsequent floaty/understeer feel of the rear end.. Even on general cornering. So after I'd done a bit of reading - I realised the N16 has a quite a heavy rear end, which is quite likely a good reason why on cornering/bumps - it displays this understeer/float, and at times - a very unstable twitch also.
So I decided I would like to attempt to rectify this issue, in order to create better overall driveability, and make the car overall better for its use in my business.
In order to do that, I decided that If I could find an N15 Whiteline Rear Swaybar, I would retrofit it to the N16. This would achieve my overall goal of firming up the rear end mildly and eliminating these issues, whilst maintaining the stock & comfortable status I need it to be. When a noticed a local member/friend selling one for a bargain $50, I went for it!

-------------------------------------------------------------------------------------
Secondly, a bit of background on the technical front..
Fortunately for us, the N16 & N15 share the same rear trailing beam suspension setup, which allows us to do this modification, but unfortunately for us - On the N16, it is not a straightforward bolt-in fitment operation like it is on the N15.
On the N15 - The Whiteline Rear Swaybar is designed to bolt directly into the 2x bolts for the brakeline bracket on the chassis, using a bracket, 8 links, and a series of nuts/bolts/washers.. Then it bolts to the trailing beam using a u-shackle, flat bar, bush, clamp, and nut/washer.
The same system applies with the N16, however on the N16 - The brakeline bracket is physically tack-welded to the chassis, instead of bolted in. This means you need to do a little bit of extra work, in order for it to fit.
Also - Because the Whiteline unit available for the N16 is getting quite scarce, and subsequently can be well overpriced - and because the Whiteline unit available for the N15 is plentiful, and subsequently can be picked up cheap seconhand - and because the N15 unit has a much better design in terms of torsion & rigidity - and lastly, because they share the same rear trailing beam suspension setup as mentioned earlier, this makes this modification a good comprimise, with an inevitably successful result.
-------------------------------------------------------------------------------------
Materials Required:-
- 1x N15 Whiteline Rear Swaybar Kit (Part# BNR21 or BNR21Z)
- 6x 14G x 25mm Self Tapping Sheet Metal Screws
- 1x 500 mL Bottle Of Brake Fluid
- 1x Hydraulic Trolley Jack
- 1x Pair Of Jackstands
- 1x Pair Of Wheel Chocks
- 1x 1/2" Drive Breaker Bar
- 1x 1/2" Drive 21mm Socket
- 1x Electric Drill
- 1x Various Metal Drill Bits
- 1x Phillips Head Driver Drill Bit
- 1x 8mm, 12mm, 14mm, & 15mm Spanners
- 1x Hammer
- 1x Old Bucket
- 1x Wire Wheel Bit
- 1x Pressure Pack Of Metal Etch Primer
- 1x Pressure Pack Of Black Enamel Paint
- 1x MIG/TIG Welder
- 1x Old Coke Bottle
- 1x 200mm Piece Of Small Clear Tube/Line
- 1x Spare Pair Of Legs
- 1x General Awesomeness
-------------------------------------------------------------------------------------------------------------------------------
Modification Process:-
Step 1: General Safety & Preparations..
Before you start the modification, you will obviously need to do a few preparations & safety procedures.
So make sure you have the car parked in a safe spot, place your wheels chocks in front of the front wheels, and then you will need to jack the car up in order to get under it to do the job.
To do this, you will need to first use your breaker bar + 21mm socket, to crack the 4x wheel nuts. Once you have done this, you can proceed to jack the car up by placing your trolley jack underneath the rear of the car in a safe location, such as the rear trailing beam itself. Jack the car up as high as you can, in order to ensure maximum working space, for ease of job. Then you can place your jack stands on either side of the bottom sill panel on the car, slowly lower your hydraulic jack, and pull it out of the way.
Now that the car is secure, proceed to remove the rear wheels using the breaker bar + 21mm socket again, by fully removing each of the wheel nuts, and subsequently removing the entire wheels.
Now the car is safe, prepared, and ready for the modification.
Step 2: Removing The Brake Lines..
Now that you've got the car safely secured, you can begin modding!
The first thing to do is to remove the brake lines.
To do this you will need to use your old bucket and place that underneath the 'drip zone' of your brake line, as this will stop fluid spill all over your floor. Then you will need to use your 8mm spanner to 'crack' the nut on the brake line, and at this point you will notice the brake fluid begin to flow out of the line. This is normal.
Continue to remove the line until it is fully unwound, and push the rubber brake line out of the way.
It is usually a good idea to let it fully drain before doing anything further, so as not to 'flick' brake fluid everywhere. You can usually make the best of your time by doing one side while the other drains, and then the go back to the original side which will have drained by the time you are done with the second side.
Repeat this step for both sides of the vehicle.
Note: Remember brake fluid is very corrosive, so it is always a good idea to keep wiping your hands on a rag. Always use the same rag for this purpose, but not for anything else.

Step 3: Removing The Brake Line Brackets..
Now that the active brake lines are out of the way, you will need to remove the old brake line bracket.
Unlike the N15, the N16 has the bracket tack welded to the body which means you cannot simply bolt it on to the body. I covered this earlier in the article.
To combat this, we need to either install a fastening system of our own, or weld it to the body. I weighed up my options and decided that most fasteners were going to either be too tricky to install, or foul on the fuel tank and/or the exhaust system, so I opted to weld it.
So in order to remove the bracket, you will need to get your drill and a small drill bit, and drill out the 2x factory tack welds right through. Once you've done this with a small bit, you will have created a pilot for to use a larger bit. The reason for this progressive drilling is because sheet metal is quite unpredictable at times, and a jag while drilling can be a dangerous. So then I used a drill bit large enough to cover the entire span of the tack weld, and redrilled it through again. Once you've done this, the weld will be 99% weakened.
Then all you need to do is simply 'knock' the bracket off using your hammer, and this part is done.

Step 4: Preparing The Swaybar Bracket Area..
Now that the brake line bracket is off, you can start to mock-up your swaybar bracket, but before you do this - you need to prepare the area.
To do this you will need to use your drill again and your wire wheel bit to suit your drill, and simply grind any old sealant and body schutz away from the area of where the swaybar bracket will intend to go. This will leave a clean surface for mounting, and a clean area of steel for welding. Once you've done this, you will be left with an area of steel that has been stripped back to bare. This is normal.
Once you've established that, you quickly need to just etch prime the area using your pressure pack of etch primer, and spray a healthy coat over all of the bare metal. This will prevent corrosion forming over the area, and prepare it for any topcoating you may do later.
Alternatively, if you intend to re-apply body shutz to the area afterwards - you can skip this part.

... Continue'd Next Post ...


