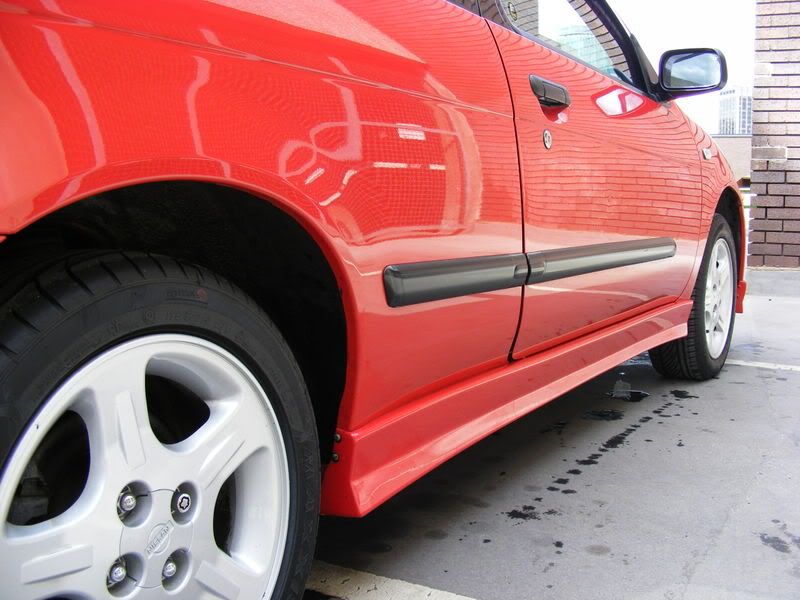
How are P2 skirts held on?

Sorry for the noobish question, but apart from the screws on each arch, how are the skirts held on under the sills, more screws or stikaflex? :confused:

It`s too dark now (especially with the streetlight it sits under not working :grrr: ) but just reversed in behind the GTi & noticed rust bubbling above the rear end of the drivers side skirt & want to sort it asap!

Thanks.
 
Now my P1 skirts were fixed on the underneath with little metal clips all they way along. On the side (top of skirt) stiker flex and obviously a screw at each end.
 
out of interest for when i fit mine, how does the door section look, because i hold the skirt up to mine and the extra lip that goes under the doors looks wrong, unfinished, as if there should be something covering it.

Anyone got any pics of this?
 
mine might be glue on, however they are also screw'd in place.

you can see them here, with another two at the front;
DSCF9293.jpg


as is the front spolier
dd
 
Hopefully, the weather will be ok tomorrow, so I can start removing the skirts etc., & I`ll get some pics for you Paul. :)

If memory serves though, they just curl over & sit on top of the sill, against the edge of the plastic sill cover. :confused:

I`ll deffo get a pic for you tomorrow. :)
 
Right, update time!

This is a pic heavy post & I`m sorry for the quality of some of them, as they were taken on my phone, in what felt like a -5 wind, even with the sun shining! :(

Here are the pics for Paul of how the fitted skirt looks. :)

Front wing to door sill

SP_A0047.jpg


Rear sill to quarter panel

SP_A0048.jpg


Full door opening, there`s a gap between the edge of the skirt & the 1st ridge on the top of the sill.

SP_A0049.jpg


Now, to deal with the dreaded rust! :eek:

Luckily, the rust bubbles that I`d spotted above the drivers side skirt, were just light surface rust & nothing serious, everything is solid & safe under the skirts. :D

This is the 1st pic I took of the process, after I`d removed all the surface rust & surrounding paintwork on the arch, & was about to start with the paint.

SP_A0051.jpg


A coat of Hammerite primer & some touch up paint later, I had this mint looking arch. :D

SP_A0052.jpg


Refitted the skirt, then turned it round & started on the passenger side arch.

SP_A0053.jpg


Now, the passenger side arch/sill had the same type of surface rust, but abit more of it. :(

Removed the skirt & found this:

SP_A0055.jpg


After a quick rinse:

SP_A0060.jpg


SP_A0058.jpg


Also found these 2 small spots halfway between the door & arch :(

SP_A0057-1.jpg


All rubbed down & ready for painting. :)

SP_A0062.jpg


Another sorted arch! :D

It`s not perfect, but as most of the area can`t be seen, because its behind the skirt, it doesn`t matter too much! ;)

SP_A0063.jpg


Job done! :thumbs:

SP_A0068.jpg


Started at about 12:30, & was on the road again by 5, & all for the princely sum of ABSOLUTELY NOTHING!!! LOL!

Thanks for looking!
 
well done sir!

Also thanks for the pics, mine stood out like a mjor sore thumb when i held them up the the car, yours blend in quite well?
 
good job fred, fancy painting mine for me?

You`re abit far away Ross! :lol:

All I used was a long, thin, flat bladed screwdriver to scrape the paint off (being good at carpentry helps with this, as you use it like a chisel), ;) & some wet & dry to rub it down before the paint goes on. :D

Body shops? PAH! Ghetto mechanicing FTMFW! :lol:
 
Shit hot Fred.

My P1 skirts are actually bolted/nailed on three times down the length, something I have not heard of on other GTi`s. The trouble is the bolts have rusted, causing the plastic to crack and dimple outwards which is very unsightly, and makes it seemingly impossible to remove the skirts without nearly destroying them. Grrrr.
 
Back
Top Bottom