N16 SR16VE

Nah, I dont mind you sharing the dyno chart at all..

Its not a very accurate header test as the setup changed a lot in between testing, but its something i suppose. Its not the all singing and dancing gains everywhere graph we'd all like to see. But it was promising at least to see gains somewhere considering it wasnt tuned.

Phils particular header is better than mine that was tested, as mine has a lot of unecessary cuts/welds, and a below par transition from the first collectors to the secondaries. After learning from my mistakes in the first one Phils header is improved and will flow a bit better, and has slightly improved ground clearance.
 
thanks dale, again your work on this header is very much appreciated! :)

here is the info dale shared with me via pm, I've edited out some things that were not relevant to the results :)

Dale said:
Hey Phil, just wanted to give you an update, i dyno'd my car today with my TriY...and i think its only right i share the results with you regardless of the outcome. To be honest im not sure what to think or come to any conclusion, becuase this isnt exactly back to back testing. I'll start with a bit of background info..

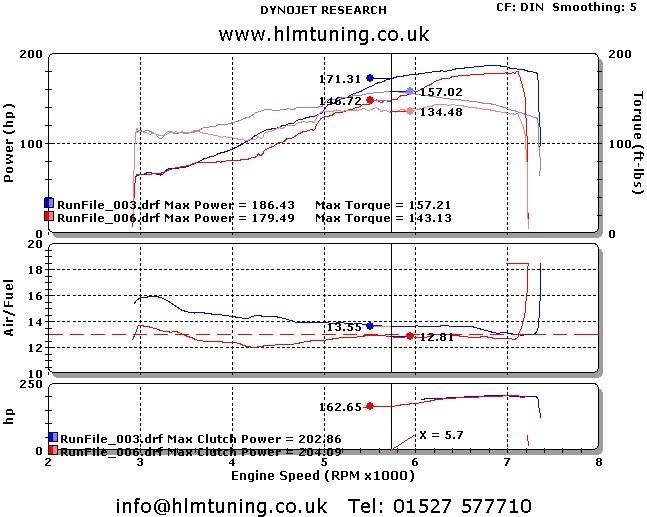
This dyno chart here is the last one i had done (last year) prior to today,
This one compares my original 186whp setup (BLUE LINE -fully mapped) VS the KSR intake manifold setup ( RED LINE - fully mapped).
HLMAutech.jpg


As you can see, the car lost a lot of torque with the KSR intake. So i ditched that intake and went back to OEM intake, I want to point out i didnt get it remapped again though. So dont know how much power it was making...


So fast forward to today, and im still running the map that was done for the KSR intake manifold (so not ideal).
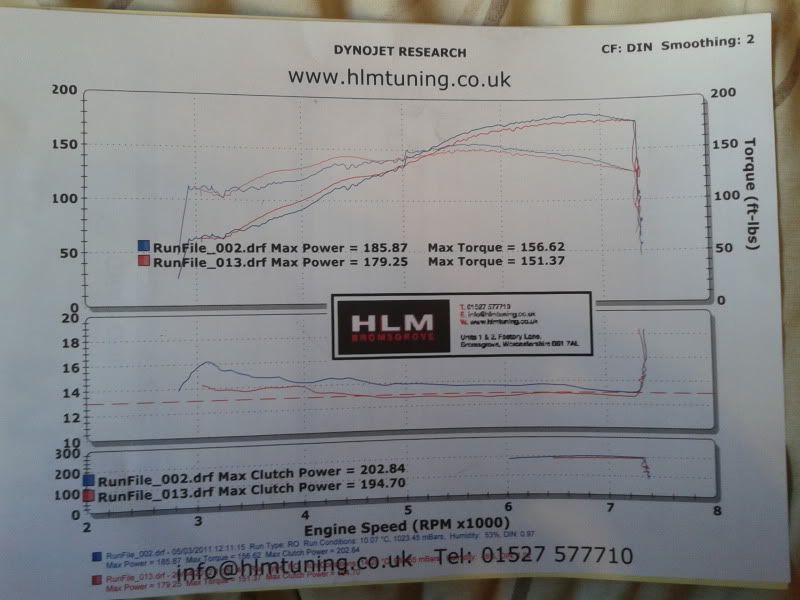
The big tube version is as i feared appearing to loose power on an 86mm motor with 11:1CR. I had read about people loosing power on the B18 motors, really only being suitable for the 'bigger motors'...well this may ring true with the SR20 too.

2012-04-20193353.jpg


As you can see, i've lost around 6whp/5ftlb from 5000-7000rpm compared to the 186whp fully tuned setup on the mazworx header. Nothing major lost, considering the car is tuned for that KSR intake manifold.

On the positive side from this, apart from being 'untuned' ive picked up 10whp between 3500-4500rpm, and the torque curve is longer and flatter than its been before.

I did have a cautious little tinker with the ignition timing at the dizzy in between runs today. Just eyeballing it.

We made one pull at 194.2hp crank, dizzy untouched. Torque peaked around 149
We made one pull at 192hp crank, dizzy retarded a few deg. Torque 147
We made the final pull at 194.7hp crank, dizzy advanced 1deg, Torque 151, plus the nice gain between 3.5-4.5k rpm.

Maybe i could have advanced it more and made more power, i didnt feel like pushing my luck so i left it at that.

I am confident that with higher compression and a better breathing VE cylinder head, that the top end of the RPM will show gains too.
 
manifold arrived today, i'm well impressed dale, may thanks again bud. i thought I'd add a pic of the bump guard/skidplate that dale had added on as it wasn't shown or mentioned before

IMG_20120424_163948.jpg


and also one of the amount of bubblewrap used to protect it during shipping, I could make a bed for my dog out of that lol :D

IMG_20120424_164042.jpg


the only thing I will have done to the manifold before fitting is to have the lambda bung removed and plated over as it has the lambda pointing down at an angle towards the ground, and i'll have a new bung put into the pipe connecting the manifold to the cat/decat after the flexi. really looking forward to seeing how it does :)
 
well as plastidip haven't had any stock of the aerosol in I decided to buy the tinned stuff as it can be thinned and sprayed with an airless spray gun, my order arrived today and as my airless gun is atbthe lockup I decided to try brushing it on to see what kind of finish it would give, so I took the front half of my filterbox and started by sanding it to key the surface

IMG_20120425_162420.jpg


I then gave it a coat of the primer, and then three coats of the plastidip itself and as you an see it covers really well!

IMG_20120425_212432.jpg

IMG_20120425_212456.jpg

IMG_20120425_212515.jpg


I'm looking forward to trying it in the spraygun as I will be able to get a much better finish than i did with the brush, but all I can say is this stuff is awesome! i'm already thinking of using it to refurb the ssr's :D
 
well today i got round to replacing the friction surface on my fidanza flywheel, but i was almost stopped at the first hurdle as none of my normal sockets were small emough to fit into the hole the nuts sit in, thankfully i had some nut spinners in one of my bit boxes and they were thin enough to fit. with the fidanza being american the nuts are imperial and with a 10mm being a little to big and a 9mm being too small they are going to require a 3/8ths socket but i only had metric nut spinners so a 10mm bit had to do.

here's the impact gun with the 10mm nut spinner which thankfully was thin enough to work
IMG_20120426_165016.jpg


and here's the old friction surface removed
IMG_20120426_170055.jpg


safe to say this flywheel has been well abused by the previous owners :-/
IMG_20120426_170105.jpg


and due to the heat created during the toruture it must have been put through the friction surface was completely buckled!
IMG_20120426_170120.jpg

IMG_20120426_170136.jpg

IMG_20120426_170153.jpg


in comparison here's the replacement surface which is completely flat
IMG_20120426_170957.jpg

IMG_20120426_170944.jpg


time to reassemble, high strength loctite just for added safety :)
IMG_20120426_170852.jpg


just a little on the end of each screw and the nut will take it up the thread when fitted, i then tightened them like car wheel nuts, in a cross pattern starting with an inside set then an outside, then the same again.
IMG_20120426_171319.jpg


and that left me with a rebuilt fidanza flywheel with a nice fresh, flat friction surface :D
IMG_20120426_173625.jpg


the whole job only took about 15-20 minutes and it's given me what's essentially a brand new fidanza flywheel, it's such an easy job and the replacement surface was only £46 iirc so if you have a fidanza with a tired friction surface i'd really recommend doing the replacement :)
 
My fidanza plate looked just like that

Where did you get yours from? I got the plate from coordsport for mine, did think it was cheaper than you said tbh but it was years ago now, brilliant service from them though!
 
Try and check the integrity of the 3 Allen screws that "support" the ring gear as it might be worth replacing them if the rest of the fly has been abused buddy

...phone...
 
sprint yeah I got mine from coordsport/partbox also, as you say top service without doubt, emails replied within a few hours, and i bought it late on in the afternoon but the surface was still delivered the next day! also of the 5 UK fidanza sellers I emailed they were the only one who answered me. I just checked and I was £48 shipped earlier this year so obviously prices have risen, no doubt due to the usd being stronger.

mike the first I read of your problems a while back I went and checked my one, and on my one the allen head bolts have a thick washer behind them holding the starter ring in place (as well as them being friction fit) so its not the bolt head itself, was yours like that also? if so was it the washers that failed or the bolts themselves?
 
I finished off my filter surround today, like I said before the finish of the plastidip using a brush isn't great but as I've said before i'm all about go before show ;)

so with both halves painted up in white plstidip (which should help reflect heat)
IMG_20120428_134314.jpg

IMG_20120428_134540.jpg

IMG_20120428_134551.jpg


I put the filter back in, hooked up the maf and put the halves back together, then i sealed up the seam between the halves with silicone

IMG_20120428_191755.jpg

IMG_20120428_191735.jpg


its now sitting drying so i'll get some fitted photos tomorrow
 
fitted the filter surround this morning so i could get the car mobile again and you can really feel the air being pulled in the cai opening under the wing when revving the engine! i think it actually looks ok now it's in place, but it's functional and that's the main thing :)

IMG_20120429_135315.jpg

IMG_20120429_135354.jpg

IMG_20120429_135412.jpg


and some beauty shots in the sun (hopefully mera red gti will be happy with these ;)) :D

IMG_20120429_135726.jpg

IMG_20120429_135444.jpg

IMG_20120429_135509.jpg
 
Nice mera there Phil ! Bet its surprised a few boy racers that one after they've been left behind ! Lol ! Nice to see yur gettin some sunshine ! Looking forward to seeing it at one of he scottish meets !
 
thanks guys, as always comments or criticism are always welcome :)

fidd70 there has been one or two puzzled faces for sure, was even better when i was only on lowering springs and still running the steelies, was a real sleeper then :)

ryan the skirts are in the garage, along with the spoiler and the ph1 and ph2 n15 rear splitters and also a set of autech spats, they will go on once i decide on what to run and they are painted to match the car ;) but tbh i'm starting to really fall for the unkitted look now it's lowered properly :)
 
Ah I must be going blind as I didn't even notice the missing spoiler lol

Mine's not got skirts on atm and it looks bare IMO as the front of them makes the car look lower / more aggressive
If you wanted to go uber sleeper then remove the fogs use them for more air as opposed to blanking them off, chuck steelies back on and go for it lol

I've tried liking them without kits but I just don't think it works very well as the styling isn't aggressive enough for my taste personally hence why we all work on making it more so I guess. Yours does with the P2 lights though they really help set it off :)

It wasn't a criticism didn't mean to offend in case I did
 
Back
Top Bottom